Today, with advances in technology and information readily available, it is very feasible to run your own website—whether it’s a blog, multimedia site, online store, etc.—without relying on third parties. This reduces costs for your business, capital that you’ll need to start in an increasingly competitive world.
In this section, as the heading suggests, we will deploy our website (WordPress CMS) on a Kubernetes system. We will assume that your Kubernetes cluster is already set up and has Ingress and a certificate manager configured. Let’s get started.
We will go through each of the elements that make up our manifest. We start by defining the namespace that will encompass each of the elements in our manifest.
apiVersion: v1
kind: Namespace
metadata:
  name: market
Next, we need to define a volume or directory where we will store the files for our WordPress project. For this, we use a PersistentVolume and PersistentVolumeClaim, utilizing the local directory on our server /mnt/r-data/market.aldrass.com and reserving a capacity of 2GB, as shown below:
apiVersion: v1
kind: PersistentVolume
metadata:
  name: market-wordpress-pv
  namespace: market
spec:
  capacity:
    storage: 2Gi
  volumeMode: Filesystem
  accessModes:
    - ReadWriteMany
  persistentVolumeReclaimPolicy: Retain
  storageClassName: standard
  hostPath:
    path: "/mnt/r-data/market.aldrass.com"

---

apiVersion: v1
kind: PersistentVolumeClaim
metadata:
  name: market-wordpress-pvc
  namespace: market
spec:
  accessModes:
    - ReadWriteMany
  resources:
    requests:
      storage: 2Gi
  storageClassName: standard
Next, we will proceed to create the deployment, specifying the number of pods needed, the port on which these pods will listen, and naming the Docker image we will use to deploy them.
apiVersion: apps/v1
kind: Deployment
metadata:
  name: wordpress
  namespace: market
spec:
  replicas: 1
  selector:
    matchLabels:
      app: wordpress
  template:
    metadata:
      labels:
        app: wordpress
    spec:
      containers:
        - name: wordpress
          image: wordpress:latest
          ports:
            - containerPort: 80
          volumeMounts:
            - name: wordpress-persistent-storage
              mountPath: /var/www/html
      volumes:
        - name: wordpress-persistent-storage
          persistentVolumeClaim:
            claimName: market-wordpress-pvc
We will define a LoadBalancer service to expose port 80 of the deployment.
apiVersion: v1
kind: Service
metadata:
  name: wordpress
  namespace: market
spec:
  selector:
    app: wordpress
  ports:
    - protocol: TCP
      port: 80
      targetPort: 80
  type: LoadBalancer
The last remaining element in our manifest is the Ingress. By defining this, we will provide external network access to our project using a URL for access. In my case, we will use https://market.aldrass.com. It is important to note that using an automatic certificate generator is key here; I am using Let’s Encrypt. This ensures that my project has a self-signed and valid certificate on the internet.
apiVersion: networking.k8s.io/v1
kind: Ingress
metadata:
  name: ingress-aldrass-com
  namespace: market
  annotations:
    nginx.ingress.kubernetes.io/force-ssl-redirect: "false"
    nginx.ingress.kubernetes.io/ssl-redirect: "false"
    cert-manager.io/cluster-issuer: letsencrypt-prod
spec:
  ingressClassName: "nginx"
  tls:
  - hosts:
    - market.aldrass.com
    secretName: market.aldrass-cert
  rules:
  - host: "market.aldrass.com"
    http:
      paths:
      - path: /
        pathType: Prefix
        backend:
          service:
            name: wordpress
            port:
              number: 80
Once we have reviewed each element that makes up our manifest, it will look like this in its entirety:
apiVersion: v1
kind: Namespace
metadata:
  name: market

---

apiVersion: v1
kind: PersistentVolume
metadata:
  name: market-wordpress-pv
  namespace: market
spec:
  capacity:
    storage: 2Gi
  volumeMode: Filesystem
  accessModes:
    - ReadWriteMany
  persistentVolumeReclaimPolicy: Retain
  storageClassName: standard
  hostPath:
    path: "/mnt/r-data/market.aldrass.com"

---

apiVersion: v1
kind: PersistentVolumeClaim
metadata:
  name: market-wordpress-pvc
  namespace: market
spec:
  accessModes:
    - ReadWriteMany
  resources:
    requests:
      storage: 2Gi
  storageClassName: standard

---

apiVersion: apps/v1
kind: Deployment
metadata:
  name: wordpress
  namespace: market
spec:
  replicas: 1
  selector:
    matchLabels:
      app: wordpress
  template:
    metadata:
      labels:
        app: wordpress
    spec:
      containers:
        - name: wordpress
          image: wordpress:latest
          ports:
            - containerPort: 80
          volumeMounts:
            - name: wordpress-persistent-storage
              mountPath: /var/www/html
      volumes:
        - name: wordpress-persistent-storage
          persistentVolumeClaim:
            claimName: market-wordpress-pvc

---

apiVersion: v1
kind: Service
metadata:
  name: wordpress
  namespace: market
spec:
  selector:
    app: wordpress
  ports:
    - protocol: TCP
      port: 80
      targetPort: 80
  type: LoadBalancer

---

apiVersion: networking.k8s.io/v1
kind: Ingress
metadata:
  name: ingress-aldrass-com
  namespace: market
  annotations:
    nginx.ingress.kubernetes.io/force-ssl-redirect: "false"
    nginx.ingress.kubernetes.io/ssl-redirect: "false"
    cert-manager.io/cluster-issuer: letsencrypt-prod
spec:
  ingressClassName: "nginx"
  tls:
  - hosts:
    - market.aldrass.com
    secretName: market.aldrass-cert
  rules:
  - host: "market.aldrass.com"
    http:
      paths:
      - path: /
        pathType: Prefix
        backend:
          service:
            name: wordpress
            port:
              number: 80
All that’s left is to deploy it to our cluster. To do this, save the manifest in a file with a .yaml extension and deploy it using the following command:
kubectl apply -f market.yamlIf our manifest was deployed without errors, we should see a result like this once we verify our deployment:
Dhampir:market.aldrass.com yuniel$ kubectl -n market get all,ingress
NAME                             READY   STATUS    RESTARTS   AGE
pod/wordpress-7976864d7c-jvjwh   1/1     Running   0          38s

NAME                TYPE           CLUSTER-IP       EXTERNAL-IP   PORT(S)        AGE
service/wordpress   LoadBalancer   10.108.240.111   <pending>     80:30436/TCP   38s

NAME                        READY   UP-TO-DATE   AVAILABLE   AGE
deployment.apps/wordpress   1/1     1            1           38s

NAME                                   DESIRED   CURRENT   READY   AGE
replicaset.apps/wordpress-7976864d7c   1         1         1       38s

NAME                                            CLASS   HOSTS                ADDRESS          PORTS     AGE
ingress.networking.k8s.io/ingress-aldrass-com   nginx   market.aldrass.com   192.168.128.50   80, 443   38s
So far, everything is good; we have deployed our web server with the WordPress base code. However, if we access our URL https://market.aldrass.com, we get the error message: “Error establishing a database connection.” What went wrong? At the moment, our site is unable to access our newly created database, which makes sense. Let’s proceed to provide WordPress with the database access details as follows:
Create a schema on our database server with the name of your preference; in my case, I will call it market. Now we need to identify the name of the pod we just deployed in Kubernetes. To do this, we can list the pods as follows:
kubectl -n market get podNow, access the pod using the following command:
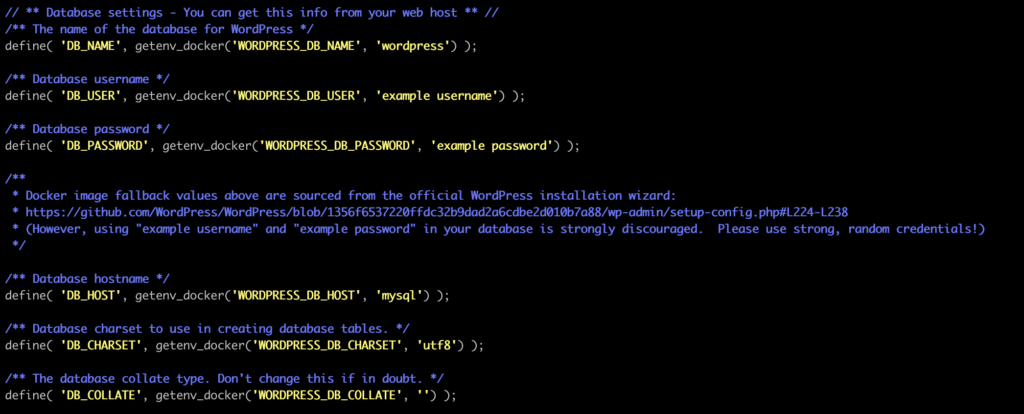
kubectl -n market exec -it wordpress-7976864d7c-jvjwh bashOnce inside the pod, open the following file with your preferred editor: /var/www/html/wp-config.php and edit the following parameters with your database access details, then save the changes:

If you refresh your page now, you should be able to see the WordPress installation wizard. The rest is straightforward: complete the setup and choose the required values, and you will have your web application deployed on Kubernetes and ready to use.
If you’ve reached this point and completed the tutorial, congratulations! If not, feel free to leave your comments here, and I’ll do my best to assist you.
Good luck with your projects.
Yuniel Alvarez


